Archives for the month of: December, 2013

Many sport pants have zippers or other treatments at the hem line, making it very difficult to shorten the pants to fit – so much so, that many people don’t buy the pants they want. Here’s a simple method to shorten sports pants, which will work for men, women and children.

Here are running pants with far too much length.

sp1

To establish how much the pants need to be taken
up, find a spot above the zipper, and pinch the fabric until the hem is pulled
up to where you want it. Make sure you wear your sports shoes when you do this.

sp2

Mark the pinch with a pin that goes through both
layers of fabric.  The entire pinched
section of fabric is above the zipper, but still below your knee.  This is the section we’re going to sew out.

sp3

Here’s how the pant leg looks with the pinched fabric. I tried to keep it relatively low on the pant leg, just a couple of inches above the zipper, so about mid-calf.

sp4

I measured from the edge of the fold to the pin
position – it shows 1 ½” which means the total amount I’m taking up is 3”.

sp5

Then I measured from the existing hemline to the
pin mark, which measured at 11”.  That
means my stitching line will be at 11”, the fold line for stitching will be at
12 ½”.

sp6

With the pants now inside out, I mark 3 measurements from the existing hemline:

11”, which is where the stitching line will show on the outside

12 ½” which is where the fabric will be folded back on itself for stitching

14” which is the other stitching line once the fabric is folded. This identifies how much of the fabric is being taken up – in my case it is 3”.

sp7

The 3 lines – I marked them with tailor’s chalk
all around the leg.  This makes it easier
to ensure a straight seam line and consistent length of the pant leg.

sp8

Using the 12 ½” line as your guide, slide the
hemline end of the pant leg back inside the pant leg (remember your pants are
inside out), which puts the right sides of the pant together, folded at the 12 ½”
line.  The 14” and 11” lines will line up.  Stitch on the 14” line as shown.

sp9

Here’s the stitched line on the inside of the
pants.  It could be trimmed and serged or
zig-zagged to remove the bulk, or it can be left in case you think you’ll ever
pass the pants on to someone else.

sp10

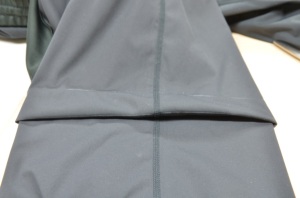
Here’s how the seam looks on the outside.  Many sport pants have these vertical seams as
style lines.

sp11

You can apply this method of shortening to many sport pants, although you might need to think a bit more about where the seam should be on form-fitting running pants.  Keep it on your calf – if it’s above the knee there’s always a chance it will chafe your skin.

This same approach can also be used to shorten sleeves on sports jackets, or even shirts that have a shaped or fitted hem.

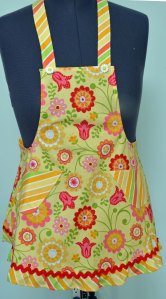
This year I decided to make aprons as gifts.  Our niece has 3 girls aged 7, 8, and 16.  It started as something to do for the 4 of them – so I did aprons for the big and little girls out of coordinating fabrics. (Click on the pictures for larger versions).

apron5 apron4 apron3 apron2

The aprons with the rick-rack and frills are for the younger girls (it’s a bit misleading as they’re posing on my adult dress form).  They’re from McCall’s 5720.

Then, I thought, I’d better do an apron for the grandmother, who lives in a separate apartment in the house, but who is very much a part of the family.  So I did something a bit different – she loves chocolate, so I found some great fabric… It’s also McCall’s 5720, but I added a bib to it.  The flared flounces are really pretty, and very feminine.

apron6

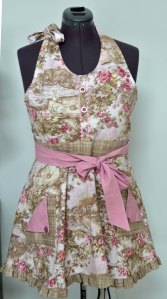
Then my husband said, “Why not do one for my mom too?”  So I did this one in a more retro style fabric… This one is McCall’s 6366 and is also very feminine.

apron1

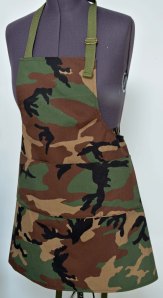
Then I started second-guessing myself about our niece’s husband, and their 5-year old boy.  So I did camo aprons for the two of them.  Both the same, one just a bit bigger than the other. I did McCall’s 6476 for the boy’s apron, and copied a man’s apron we had at home for his dad.  Each apron has several pockets – for the dad, they’ll conveniently hold 2 to 3 beer, for the boy, a Teenage Mutant Ninja Turtles water bottle.

apron7 (This one would look more masculine if the dress form didn’t have boobs!)

Lessons learned from this project:

  1. Use a top stitching foot and it will help keep all your top stitching nice and straight, making for a really professional looking garment.
  2. Try to avoid making your apron with a fixed loop that goes around the neck – they’re either too long or too short.  Opt for ties instead which allows you to customize the sizing a bit more.
  3. You really do need a bodkin or other tool that will allow you to turn the ties, as they get realllllllllly long!
  4. Good quality cotton (like the beautiful quilting cotton I used) is really a treat to work with.  Everything folds so nicely and stitches up so well.
  5. If you do things as a production line, it can go quite quickly.
  6. Don’t be afraid of aprons – they aren’t at all difficult.  And almost no-one has them these days, so they do make great gifts.

It was a fun project and I loved the finished results.  Although they aprons didn’t get really high billing on Christmas morning, they will last longer than toys, so I’m sure sooner or later everyone will discover a good use for them.

Tan and Teal

Tan and Teal by melaniemac featuring a green sweater

Etro green sweater
farfetch.com

Dorothy Perkins blue tee
dorothyperkins.com

Lauren Ralph Lauren zip jacket
$730 – houseoffraser.co.uk

White Stuff straight jeans
$82 – johnlewis.com

Scarve
notonthehighstreet.com

Echo purple scarve
nordstrom.com

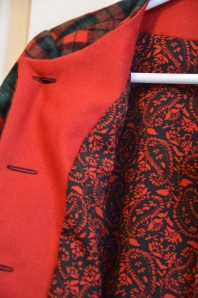
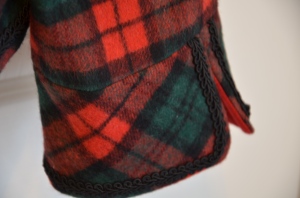
In a previous post, I introduced the plaid Chanel jacket that provided inspiration for my jacket, given that I had some very similar fabric.  Here are a few pictures of the finished product, but I wanted to share some great things I learned about being creative when you really don’t have enough fabric for the project.

  1. Cut your facings from a complimentary fabric.  Make sure the colour matches, and make sure that the facing is in the same, or similar fabric.
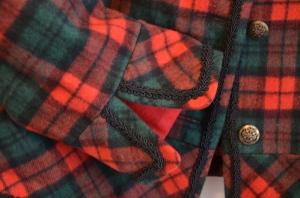
  2. Break your pattern pieces into blocks.  In my case, I didn’t have enough length for my pattern pieces, so first I found a pattern that had lower front pieces (see previous post).  I cut them on the bias as I couldn’t match the plaids on the lengthwise grain.  Then I duplicated this on the arms by creating a lower piece to the sleeve.  In addition, because I was running short on continuous pieces of fabric, I cut the lower sleeve into fronts and backs.  This gave me a seam at the underarm, plus one on the outside.  I shaped the outside seam to match the curve on the lower jacket front, then ensured I ran the trim all around it. A telltale sign of a Chanel jacket is a 3-piece sleeve that allows for a split and trim on the outside of the sleeve, so I reasoned that this was a good design element to add.
  3. Cut pieces on the bias if needed.  In a plaid, it’s fairly obvious that pieces are cut on the bias, but there’s no reason you can’t do it with a plainer fabric as well – even a striped fabric!  Just make sure that you interface your pieces to avoid bias stretch. So for my jacket front pieces, I interfaced them, but cut the interfacing on the straight grain, so the bias doesn’t come into play.
  4. Use facing creatively.  I used a colour facing for the sleeve pieces and for the jacket body.  On the back body, I had to cut leftover pieces of fabric to face it as well, as I didn’t have enough fabric to cut the body back longer and hem it up.  As a result, I ran the lining down to 1″ from the hem, as the facing pieces did not match the plaids – at that point, I was using scrap pieces to create a hem facing for the back. What I should have done was cut facing for the back out of the same red, but I ran out of that as well!

finished facing_lining sleeve2 sleevel1 bottom

Other things I learned (in the “don’t do this again” category)

  1. I didn’t do formal full bust adjustment – just tried to use two pattern sizes.  Never works as nicely.
  2. I could have used red thread in my bobbin when making the buttonholes, or could have been less lazy and made bound buttonholes.
  3. You really do need the scotch tape on the end of braided trim – without it, you will have all kinds of unravelling happen!

Hope my hits and misses give you some food for thought.  Happy sewing!

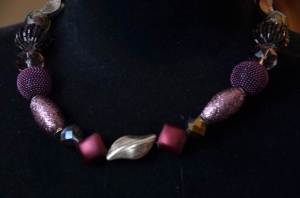
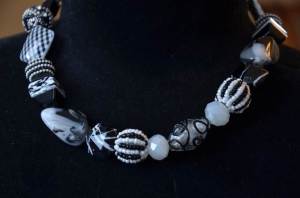
A departure today:  here are a few necklaces I created to go with outfits I’m sewing.  I had three custom beading courses with the very talented Cathi Westrop, who taught me basics that I needed to get started.  These necklaces are the result!

It seems like a logical extension that once you start making your clothes, you’re going to want to make accessories to go with them. The challenge is in avoiding diluting your main focus:  getting involved in too many other sidelines can take all take a lot of time.  For instance, I’ve always been an avid knitter (big stash), and am drawn to bead supplies like a moth to a flame (medium stash).  But it seems like there are also some pretty interesting things happening in the areas of felting, handbags, and leather work – all of which could generate great pieces to accessorize my created wardrobe!  Arrrrrrgh!  My Christmas list is probably longer than most kids lists!

necklace5 necklace4 necklace3 necklace2 necklace1

Are you challenged by complimentary creativity?  How do you manage it?

THORNBERRY

Things I make and holidays we take

My Love Affair With Sewing

Sharing My Passion For Creating My Own Clothes

Curvy Sewing Collective

A Plus Size Sewing Community

KT's Slow Closet

Knitting ideas, inspiration and free patterns, plus crochet, weaving, and more

Fabrickated

Making Life more Beautiful

The Overflowing Stash

...320 and counting

Sewing Tidbits

Handmade Style Files, since 2013

Custom Style

Sewing that's Retro, Geek, and Chic

Lányos Handmade

The Shop, The Blog and More!

Jet Set Sewing

Recreating Designer Looks from the 20s to the 70s

Sew Busy Lizzy

she sews by the seashore...